

A sensor or button that will not pair is usually held back by a region mismatch or a device that never entered pairing mode. Work through the checks below in order, because the first two resolve most cases.
Key Takeaways
- The Nation Code printed on the sensor or button must match the hub's: EU devices pair with UK or EU hubs, and US devices pair with US or AU hubs.
- Pressing the SYNC button once on a hub with a solid blue LED puts the hub into pairing mode.
- A sensor or button that has been reset correctly blinks its LED rapidly and is ready to pair.
- Resetting the hub as well as the sensor clears pairing records that survive a sensor reset alone.
- Sensors and buttons ship with a battery insulation tab that must be pulled out before the battery makes contact.
Check Before You Reset
Step 1: Compare the Nation Codes
Nation Codes are printed on the label of each device. Before resetting anything, compare the code on the sensor or button with the code on the hub. If the Nation Codes do not match, the devices may not be compatible. To prevent this issue, avoid buying devices from another country or region; instead, buy them from a local online store or retailer.
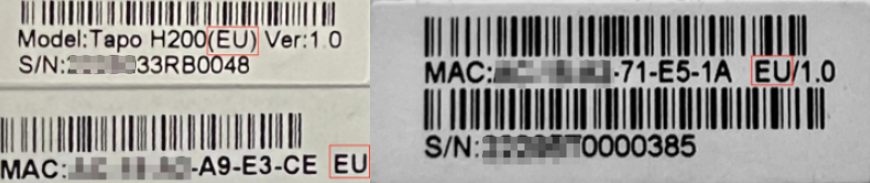
Note: Sensors and buttons with EU Nation Codes work with hubs with UK or EU Nation Codes, and sensors and buttons with US Nation Codes work with hubs with US or AU Nation Codes.
Step 2: Remove the Battery Insulation Tab
Pull out the battery insulation tab if it is still in place. A new device stays powered off until you remove the tab.
Step 3: Move the Sensor Closer to the Hub
Move the sensor or button closer to the hub and start pairing again. You can move it back to its final position once it has joined the hub.
Reset and Pair the Devices Again
Step 4: Put the Hub into Pairing Mode
Watch the LED on the hub while the app looks for the sensor. A blinking blue LED means the hub is already in pairing mode. If the LED is solid blue, press the SYNC button on the hub once to enter pairing mode manually.
Step 5: Reset the Sensor or Button
Reset the sensor or button until its LED blinks rapidly, indicating the device is resetting and ready to pair. The procedure depends on the model: Tapo Motion Sensor, Tapo Door/Window Sensor, Tapo Smart Button, or Tapo Smart Switch. For any other model, follow the user manual to enter pairing mode.
Step 6: Reinsert the Battery and Check the Battery Level
Remove and reinsert the battery to reboot the device, then run the setup once more. If the LED stays dark or very dim, the battery is low. Follow the battery replacement guide for your Tapo Sensor, Tapo Smart Button, or Tapo Smart Switch and try again.
Step 7: Reset the Hub and the Sensor, Then Add Both Back
If the sensor or button still cannot join, clear the pairing records on both sides. Reset the hub to factory defaults: on Tapo H100 and H110, press and hold the SYNC button for 10 seconds until the LED blinks orange; on Tapo H200 and H500, use a pin to press and hold the Reset button until the LED blinks red rapidly.
Then reset the sensor or button as described in Step 5, open the Tapo app, and add the hub first, then the sensor. A factory reset removes every sub-device from the hub, so you will need to add your other sensors and buttons again.
Still Can't Connect?
If the sensor or button still will not pair after these steps, contact TP-Link technical support and include the model of your sensor, the model of your hub, and the Nation Codes shown on both labels.